
Boot performance is something that is very important for end-users (customers). You don’t want to wait 3 minutes for your system to boot and be ready for your orders.You want it done as fast as possible.
It’s important to know what Windows does when it boots, only then you will be able to know how to increase the system boot performance, so read Learning: How does Windows 8 boot first! Then you are ready to start this How to Increase Windows Boot Time and Boot Performance tutorial.
[divider]
Learning Path Information
Knowledge Requirements
1% is the lowest knowledge requirement, in fact this should everyone have if they are able to power on a computer (you need to press the power button…) 100% is expert level.
[symple_skillbar title=”System Services and Processes” percentage=”65″ color=”#65C25C” show_percent=”true”] [symple_skillbar title=”Command Line” percentage=”25″ color=”#65C25C” show_percent=”true”] [symple_skillbar title=”Administrator Tools” percentage=”50″ color=”#65C25C” show_percent=”true”]Warning
[symple_box color=”red” fade_in=”false” float=”center” text_align=”left” width=””] WARNING: The tools used in this post can disable system services and processes. Be aware that you need to be familiar with vital Windows services and processes before disabling, removing or modifying any of them. This could result in system damage that might not be recoverable. Please read our Terms and Conditions which states that WindowsInstructed or the Author cannot be held liable[/symple_box]
What do I need to analyse my Boot Performance?
In order to execute all steps in this learning module you need the tool XPerf from the Windows performance Toolkit available in the Windows SDK for Windows 8.1. You can download that here http://msdn.microsoft.com/en-us/windows/desktop/bg162891.aspx Be sure you only install Windows Performance Toolkit, the other tools are not required.

Starting the Application
Once installed, you need to start recording a boot, you can do this with the tool that was installed called xbootmgr.exe be aware that this tool has no UI and it needs to be enabled by the command prompt.
- Start an Elevated command Prompt (Run as Administrator)
- Navigate to the folder where the tools are installed by entering the following command: For 64 bits Windows Operating Systems: cd C:Program Files (x86)Windows Kits8.1Windows Performance Toolkit For 32 bits Windows Operating Systems: cd C:Program FilesWindows Kits8.1Windows Performance Toolkit
- Save all your work and close all applications
- Then enter the command: xbootmgr -trace boot -traceflags base+latency+dispatcher -stackwalk profile+cswitch+readythread -notraceflagsinfilename -postbootdelay 10
- Hit enter, Windows will automatically reboot
- DO NOTHING, XBootMgr will trace everything and show the following message when it’s done:

This Window will close after a few seconds to minutes, wait for this process to complete. When it’s done continue executing these steps;
- Open Start
- Search for Windows Performance Analyzer and open the application
- Click on File and Open…
- Open the most recent .etl file you can find.
Analyzing the ETL file
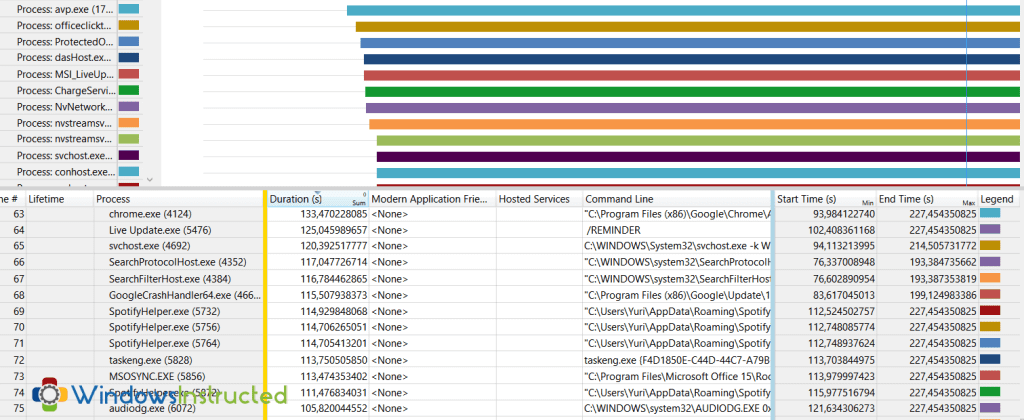
You’ve now successfully recorded and opened your boot trace. The first time you see the Windows Performance Analyser the information might be a bit overwhelming, its normal! Double-click the first box named System Activity Processes by Lifetime and you should see a screen familiar to this one.

See the image above, the most important information, and the information we will work with is marked with red lines.
- Proces This tells you which process it’s about, this will be useful information later as we then know what to disable to improve boot time
- Duration As the name tells you, it’s how long it took for the proces to finish (in seconds)
- Start Time & End Time This tells you how many seconds after boot the proces it started and how many seconds after boot it finished.
The first thing I always do is sort the information on the Duration column from high to low. This immediately tells you which processes are using the most resources on start-up and which we can disable to improve boot time [alert-warning]REMINDER: Be very careful on the next steps, as disabling crucial system services and processes can make your system unusable.[/alert-warning]

As you can see you will see a lot of processes originating from the WINDOWS folder. NEVER disable any of these without checking if this is a legit Windows process. These processes are crucial to your system. The first process in the demo list that is safe to disable such as nvxdsync.exe (1168) however upon a closer view you will see it might be important (“C:Program FilesNVIDIA CorporationDisplaynvxdsync.exe”). The best thing you could do is to search what this process does and if important leave it alone. I recommend using this website to check processes: File.info (http://www.file.info/windows/nvxdsync_exe.html) The next process we actually could disable is MSI_LiveUpdate_Service.exe (1960) and as an example we are going to do that. Since it took 180 seconds to boot it’s a quite heavy program.
[divider]Getting the right tools
For this module we are going to work with Autoruns, this tool gives you the possibility to disable services and processes that run at start-up. In theory it’s the same as the old Msconfig and nowadays Task Manager (Start-up) but it’s more detailed and has a huge number of features both msconfig and task manager don’t offer. You can download Autoruns on Microsoft Technet located here: http://technet.microsoft.com/en-us/sysinternals/bb963902 After downloading and extracting Autoruns we’ll need to start the tool as Administrator. (Right-click autoruns.exe and select Run as Administrator)

Wait for the program to finish scanning your system, you can see the current status of the program in the left corner, when it’s done it will show done and you will see a list of processes pop up.
Using Autoruns
Now that we have opened Autoruns we can take a look at the services and processes. You will see that a lot of Windows services and security software services will be listed, this is normal and you should never touch them if you don’t need to. In the previous module we took a look at some processes that were using a lot of system resources and thus slowing down the boot experience. We concluded that we could disable MSI_LiveUpdate_Service.exe safely. So lets do that, shall we? The easiest way to accomplish this is to search for that particular file in Autoruns, you can do that by pressing CTRL+F on your keyboard and entering the filename (1) MSI_LiveUpdate_Service.exe.

If you did this right, you will find the first process you wrote down to disable. To delete this process from starting up on the next boot we can right-click the process and select delete. You will get a confirmation screen, always double-check if the process you are disabling is really the process you searched for. Always double-check if the process does not appear two times in Autoruns, in rare cases this could happen, be sure to remove them both.
Conclusion
This concludes this learning path. I hope you learned how to use Xperf and Autoruns to determine which processes are slowing down the boot process and how to disable them.