Windows 10 has two free video tools. Windows Video Editor (formerly Windows Movie Maker) is dedicated software for editing videos. You can use it to cut, rotate, crop, trim, split, and join your videos.
You can also use Windows Video Editor to enhance your videos with animations, effects, subtitles, text, music, and watermarks. You can play with the video speed, adjust brightness, and change the contrast and saturation.
A less known Windows 10 video editor is the Photos application, which can also be used to edit videos. Read on to learn how to take advantage of these two Windows 10 media editors.
1. Compressing Video Size
Videos are large files, and it may take a while to upload or download them. If you are sharing videos over social networks or your websites, video size will affect the quality and performance of video streaming. Compressing videos to reduce their size can make them much easier to transfer and view.
To compress your videos with Microsoft Video Editor:
- Open Microsoft Video Editor (formerly Windows Movie Maker).
- Upload your video to Microsoft Video Editor, and edit it if required.
- Trim the video to exclude parts which are less interesting or not relevant (see #3 below). This will reduce your video size, even before compression.
- Click Export at the top-right.
- Select one of the export options: Small, Medium, or Large. Selecting either Small or Medium automatically compresses your video.
- Select a folder and save the reduced video to your hard drive.
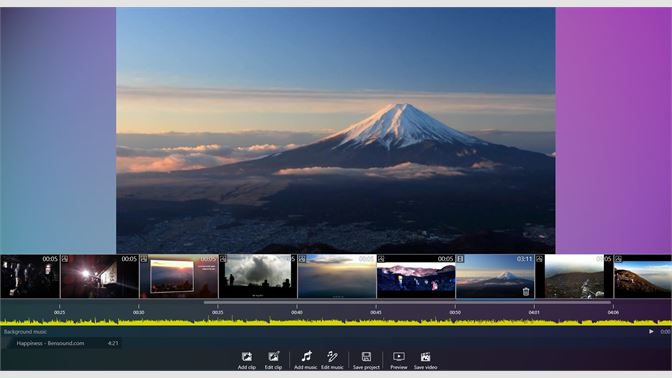
2. Create a Video from Scratch
Windows Video Editor can help you create nice-looking videos from a combination of photos and existing videos.

To create a new video with Windows Video Editor:
- From the Create menu, select Video project.
- Select photos and videos you want to include in your video.
- Name your video.
- You can change the way each photo or video clip appears in your video. Select the clip from the carousel at the bottom, and click an option like Filters or Motion.
- Save your video project and if necessary, export it to a video file to share it with others.
3. Trim a Video
Many home-shot videos have a few interesting parts and long durations where nothing interesting is happening. You can cut out those less interesting parts before saving or sharing the video with others. Trimming a video will also reduce the video size.
To trim a video using the Windows Photo app:
- From Windows File Explorer, right-clicking a video file, select Open With, then select Photos.
- The video opens in the Photos application. Click the Edit & Create button.
- From the menu, select Trim.
- You will see there are two handles on the playback strip. Drag them left and right to select the part of the video you want to keep. Use the blue pin to see what happens in the video, to understand where to start and end the trim. You can also play back the selected video section.
- Click Save a Copy. This will save another file with only the trimmed version of the video, keeping the original video intact.
The trimmed video will be saved in the same location as the original video, with the word “Trim” appended to the filename.
4. Switch a Video to Slow Motion
You may want to show an entire video, or parts of it, in slow motion. It can be cool to emphasize a dramatic event, or help the viewer understand events that are happening very quickly, such as fast action in a sports game.
To set a certain part of a video to display in slow motion:
- From Windows File Explorer, right-clicking a video file, select Open With, then select Photos.
- The video opens in the Photos application. Click the Edit & Create button.
- From the menu, select Add Slo-mo.
- Select a section of your video file, and click to apply slow motion.
The photo app modifies the selected segment of the video to show in slow motion.
5. Save a Photo From a Video Frame
Most of us have shot videos using our mobile phone and at the same time, saved video frames to use as still images. You can do the same thing in Windows, for videos already stored on your computer.
To save a photo from an existing video:
- From Windows File Explorer, right-clicking a video file, select Open With, then select Photos.
- The video opens in the Photos application. Click the Edit & Create button.
- From the menu, select Save photos.
- Play the video and stop when you reach an interesting frame. Click to save the frame as a photo. You can use the Previous Frame and Next Frame buttons to pick the exact frame that interests you
6. Add 3D Effects to a Video
Using the Windows Video Editor, you can add cool 3D effects to a video. See some of the effects in the image below.

To add 3D effects to a video in Windows Video Editor:
- Open Windows Video Editor and upload a video, or load an existing video project.
- Select the video file at the bottom of the video project.
- Click one of the 3D effects to add it to your video and make it look better.
- Drag the edges of the effect to define where in the video it will appear.
Conclusion
Hopefully, this article helped you learn a few new tricks for video editing in Windows 10. The six techniques explained above should be easily implemented by computer users of all levels. Once you feel ready, you can move on to more advanced editing using this guide for transition.
If you’re creating instructional videos, you can use this article as a starting point. Continue expanding your knowledge base and experimenting, and you’ll have your own tips to share in no time.
