When you are connected to any network using your Windows pc, all the computers using that network get an unique number assign to them in other to keep them apart. We call this there internal I.P. or Internet Protocol. If you are using a router in your home that enables more then one pc to connect to the internet, it’s most likely that he assigns the internal IP’s to each computer. In order for communication on your network to work, all the computers and other devises using it need to have there own unique IP. But sometimes things don’t go the way there are designed and you get an ip address conflict. Luckily for use there are some easy ways to fix them.
1. Let’s see if the router can fight it’s own battles
First Shutdown all hardware connected to your router. After they are all turn off restart your router (just remove the power source for 5 minutes). Restart the PCs and all the other hardware one by one. That should clear all the IP addresses and force the router to give out new ones.
2. If that doesn’t work, it probably is your PC’s fault.
Since the router isn’t the problem (probably), let’s force your computer to ask the router for an new IP.
Start button > Run > Type in: cmd > Enter >
In the CMD windows type:

ipconfig/release
ipconfig/renew
This will release and renew your IP address and resolve the issue if it is at your computer.
3. And if that doesn’t work
We will have to try harder. Please note that the following steps will reset the settings you use to connect to the internet. If you are using special settings to connect to your corporate network or assigned to you by your internet provider, STOP and contact them first for assistance if you are not 100% sure what you are doing.
Configure DHCP for Windows:
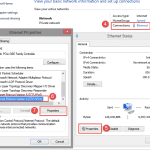
- Click on the Start menu and select Control Panel.
- Go to Network and Internet. (You can skip this step if you do not see this item.)
- Click on the Network and Sharing Center.
- Go to Manage network connections.
- Right click on Local Area Connection and choose Properties.
- Select Internet Protocol Version 4(TCP/IPv4) and click Properties.
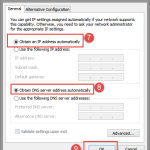
- Select Obtain IP address automatically.
- Select Obtain DNS server address automatically.
- Click OK to close the TCP/IP Properties window, the Local Area Connection Properties window, the Network Connections window and the Control Panel window.
- Restart your computer.
TCP/IP stack repair
Start button > Run > Type in: cmd > Enter >
In the CMD windows type:

Reset WINSOCK entries to installation defaults: netsh winsock reset catalog
Reset IPv4 TCP/IP stack to installation defaults. netsh int ipv4 reset reset.log
Reset IPv6 TCP/IP stack to installation defaults. netsh int ipv6 reset reset.log

1 Comment